Introduction
Kubernetes is a production-ready, open source platform designed with Google accumulated experience in container orchestration, combined with best-of-breed ideas from the community.
Containerization helps package software to serve your business goals, enabling applications to be released and updated in an easy and fast way without downtime.
Containizer applications are more available and flexible than the past deployment model, in which applications were installed directly in specific machines as packages deeply integrated into the host.
Cluster Structure
Kubernetes has a basic cluster structure: a master who coordinates the cluster and nodes (or minions) where the applications run. Let's explain each one in detail.
Master:
It is the central control point that provides a unified view of the cluster. There is a single master node that controls multiple minions or nodes.
The master server not only works as the main management contact point for administrators but also provides many cluster-wide systems for the relatively dumb worker nodes.
It runs a number of unique services that are used to manage the cluster workload and direct communication across the nodes.
Nodes:
A minion is a worker node that runs tasks as delegated by the master. Minions can run one or more pods. Besides, they provide an application-specific "virtual host” in a containerized environment.
Each minion has an agent called Kubelet that manages the minion itself and its communication with the master.
In order to handle container operations, minions need a container tool such as Docker or Irk. Our approach is to focus on docker only.
As we said before, Kubernetes is production-ready. That means it can handle production traffic. To accomplish that, having at least 3 nodes is recommended.
Let's continue with the Pod concept.
Pods:
Pods are the smallest deployable units that can be created, scheduled and managed. They are a collection of containers that belong to an application. Kubernetes pods come and go, that's, if one of them shuts down or crashes, a new pod will be started. When scaling up or down or when doing rolling updates, pods are created or destroyed.
Master-Minion Interaction
In this section, we'll talk briefly about the interaction between a master and its minions from a deployment perspective.
When you want to deploy applications on Kubernetes, you have to tell the master to start the application containers. As described above, the master is the only contact point for users, developers, administrators, etc. It schedules the containers to run on the cluster nodes.
The nodes communicate with the master using the Kubernetes API, which the master exposes. If you want to deploy an app, the only thing you have to do is to send a command to the API mentioned before, which is called kubectl. Then, the master sends the action to a minion.
For example, the action could be “make a deployment of this application with these services”, where you specify the docker image to be used and the number of replicas you want to have for that application. The action to run is built in a yml file where you build a pod with its parameters (see below).
Then, the minion creates a pod (a collection of containers) by reading the file passed on by the master.
Now, we have our application running in a pod, but it is still not receiving traffic from the internet. To provide external traffic to a Pod, we need to expose the app.
For that purpose, Kubernetes creates a Service. A Service is an abstraction layer which defines a logical set of Pods and enables external traffic exposure, load balancing and service discovery for those Pods.
In other words, it is a mechanism through which a POD can be reachable from the internet . The service section is defined into yml as well, or a separate file with service definition can be created, if you want to (see details below)
General View of Kubernetes Cluster

Practical Approach
In this section, we're building a dockerizer kubernetes cluster using mesos as a scheduling manager. Mesos provide us the minion to run services. For this approach, we are using docker compose and we are attaching all that's necessary to carry it about.
Step 1: create kubernetes cluster
In this step, you need to run docker compose with the attached file , called docker-compse.yml, as follows:
And then you'll get this output:
That means kubernetes is already talking with mesos… where 69bb8db1-aaae-44df-94ee-c78ef1b060f8 is the id of the mesos master.
Step 2: create service yml for Kubernetes
The file for testing is attached, so we just copy those files into the kubernetes container by running
After this, we need to jump into the kubernetes container
Step 3: create pods based on a yaml file
We do this by running the commands already mentioned (kubctl). In this case, we have to create the pods as follows:
create: specify to kubernetes what we want to create a pod.
-f define the pod specifications such as name, kind of services to run, docker images, its env vars, etc.
-s specify to kubectl the kubernetes server. For instance, we configured that one in 172.24.0.6:8888 into docker compose file, so replace that ip with yours before running it.
Note: if we configure everything as localhost, kubernetes will show an error message to create its services.
After running the create command, we get this:
Step 4: check if everything went fine
Once a pod is created, we can check the pods and services status with kubectl command as follows:
Now we are ready to test our running services. In the next we will take a look at them.
Step 5: Open the deployed application
In my case, I’ve created a tomcat pod with an app running (personal app) where I´ve stored the data into mysql (another Pod).
The following cap shows how the app works and the data coming from mysql:
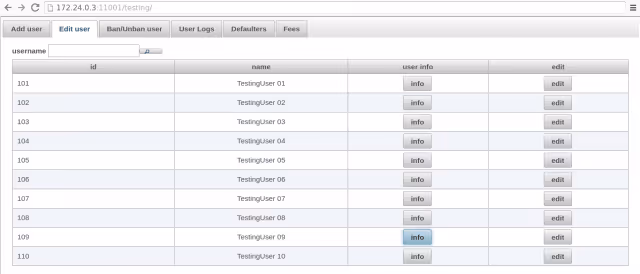
As you can see, our app is running under our kubernetes-mesos infrastructure.
I obtained the tomcat IP by asking Kubernetes about the Pod endpoints. Here’s the command used to get that:
Output:
Notes: if you're going to use your own java web application, you have to deploy it by using tomcat8 web interface or by console (out of this article).
Conclusion
Kubernetes is a powerful tool if you about in cloud tools. Nowadays, too many people are migrating to it, due to the fact that kubernetes provides a good a solution when you are thinking of mounting your application infrastructure in the cloud. So, give it a chance.
If you are looking for a partner that can help you with these complex tasks, Devlane is ready to help you.
We've been helping companies for over 10 years, with customized software development or dedicated teams for expanding in-house development teams from our clients.
Find out more here.
Resources:

Other Blog Posts
Best Generative AI Tools in 2026: The Complete Guide


Nearshore software development in LATAM: The strategic advantages beyond cost