
What are you going to learn here?
- You will learn how to develop React Native apps using Redux-Saga library
- Learn how to separate the business logic from the presentation layer.
- Get introduced to React Hooks API
IMPORTANT
This guide is not an in depth description of how React Native works, prior knowledge is required.
By following the exercises and guidelines outlined in this guide you will be ready to join projects that follow the same methodology or kick start new ones.
This guide assumes that you have configured your Environment for React Native development. For instructions on how to get started go here.
Lab repository is here.
GETTING STARTED
We will start by creating our React Native project. To do so run the following command:

This will create the initial structure of a React Native app for us, pretty standard stuff. If you were to run the app at this point you will see the ‘Welcome to React’ screen, so let's start by cleaning it up. Go to AwesomeApp/App.js and replace the code with the following snippet:

Now that we cleaned up the initial screen lets start creating our project structure. Inside/AwesomeApp run the following commands on your terminal ‘mkdir src && cd src && mkdir configurations’. This folder will be the backbone of our app, here we perform the initial configurations and initializations.
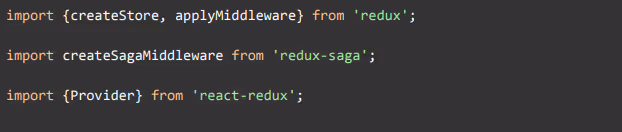
REDUX-SAGAS
Overview and Initialization
We will start by adding the Redux-Sagas framework. Run the following commands on the root of the project:

Let's create our Root Component. Go to src/configurations and run the following command ‘touch Root.js’. Add the following code snippet to your Root.js file:
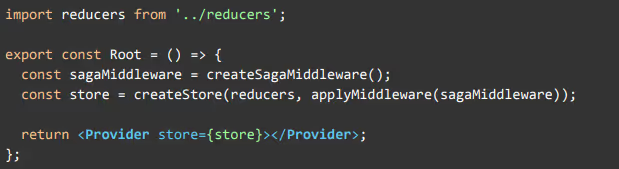
There is a lot going on here so let's dig in. First of, what is Redux ? The documentation describes Redux as:
"A pattern and library for managing and updating application state, using events called "actions" it serves as a centralized store for state that needs to be used across your entire application, with rules ensuring that the state can only be updated in a predictable fashion"
This is great, we can now share state between different components of our app without ‘lifting state up’.
This concept helps us decouple the business logic of our app and removes dependency. We can now accomplish Single Responsibility, a Component does not need to worry about propagating state updates, Redux takes care of that for us.
In order to accomplish this Redux introduces 3 key concepts: Actions, Reducers and the Store.
We will learn about them throughout this Lab, so don’t worry just now. Now that we have established what Redux is and what it does for us, why Redux-Sagas?
Well, it's a library that helps us make application side effects easier to manage, more efficient to execute and handle failure states, such as asynchronous code like client APIs.
What is a Saga? According to the documentation:
"The mental model is that a saga is like a separate thread in your application that's solely responsible for side effects. redux-saga is a redux middleware, which means this thread can be started, paused and cancelled from the main application with normal redux actions, it has access to the full redux application state and it can dispatch redux actions as well"
The function createSagaMiddleware() does exactly this for us, it creates the Saga middleware for the Redux-Sagas library.
A middleware in Redux is:
"A third-party extension point between dispatching an action, and the moment it reaches the reducer"
We will not go deeper in explaining the Middleware, for further information follow this link. For now it is enough to know that it helps the Redux-Sagas library communicate with Redux. Notice that after initializing our Middleware we create the Redux store with it and we also specify the Reducers we are going to be using as well as triggering our sagas.
You might have also noticed that we don’t have any sagas or reducers, before we create them let’s learn about the Store.
REDUX STORE
Here is where the application state lives. There is only a single store on Redux. The Store is also the object that brings Actions and Reducers together.
So the Store has the following responsibilities:
- Holds application state
- Allows state to be updated via dispatch(action)
The only way to update the state is to call store.dispatch() and pass in an action object. The store will run its reducer function and save the new state value inside, and we can call getState() to retrieve the updated value.
You can think of dispatching actions as "triggering an event" in the application. Something happened, and we want the store to know about it. Reducers act like event listeners, and when they hear an action they are interested in, they update the state in response.
3. Allows access to state via getState()
In this guide Actions are replaced by Sagas as they represent exactly the same concept. In order to trigger our Sagas we execute sagaMiddleware.run(sagas). This can only be done after we apply the Redux-Sagas middleware to Redux, as we did earlier.
So now that we started talking about Reducers and Sagas lets create them.
REDUCERS
A reducer decides how to update the state when necessary. Is a function that receives two parameters: an Action and the current State. As we said earlier, it is listening to the events dispatched by the Store.
"An action is a plain JavaScript object that has a type field. You can think of an action as an event that describes something that happened in the application. The type field should be a string that gives this action a descriptive name. An action object can have other fields with additional information about what happened. By convention, we put that information in a field called payload"
Reducers must always follow some specific rules:
- They should only calculate the new state value based on the state and action arguments
- They are not allowed to modify the existing state. Instead, they must make immutable updates, by copying the existing state and making changes to the copied values.
- They must not do any asynchronous logic, calculate random values, or cause other "side effects"
Makes sense right ? Time to see them in action.
From the root of the project run the following command ‘cd src && mkdir reducers && cd reducers && touch index.js’.
Add the following code snippet to /src/reducers/index.js:
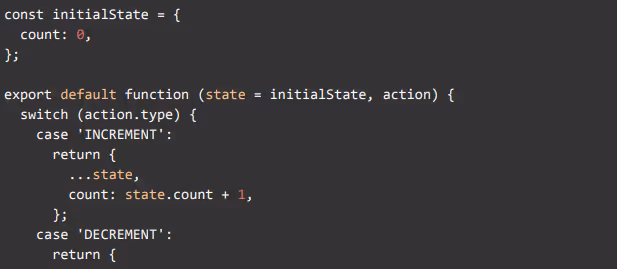

The state of the app is going to be the count variable, pretty simple. When the action is of type ‘INCREMENT’ we increment the counter by 1 and so forth. In order to guarantee immutability we are using Javascript spread operators to make a copy of our original state, then we apply the changes to such copy and return it.
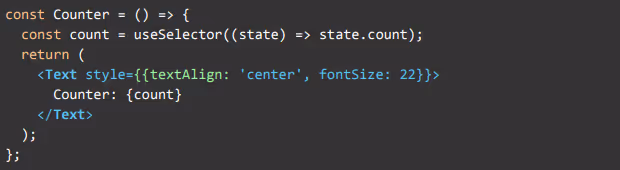
Time to add some UI, copy and paste the following snippet to Root.js Component:
Tip: Make sure to update the corresponding import statements.
We are using our first Hook, useSelector() allows you to extract data from the Redux store state, using a selector function. For more information follow this link. Components must be wrapped inside the tag to make the store available throughout the component tree.
A brief overview of the Provider:
"The <Provider /> makes the Redux store available to any nested components that have been wrapped in the connect() function. Since any React component in a React Redux app can be connected, most applications will render a at the top level, with the entire app’s component tree inside of it. Normally, you can’t use a connected component unless it is nested inside of a <Provider>"
Add a function to dispatch our actions:

Add the following code inside our Root’s component:

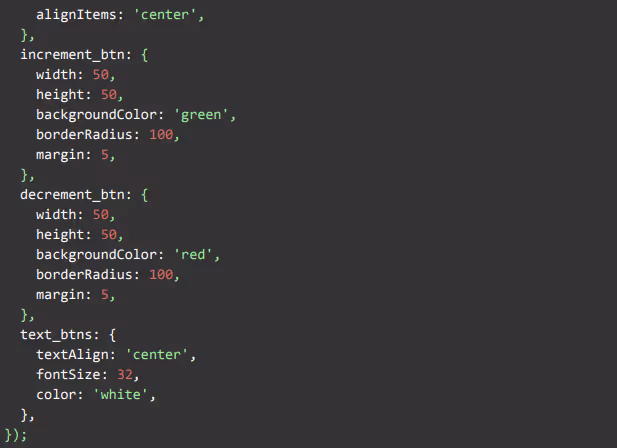
Add the following Styles to Root.js:

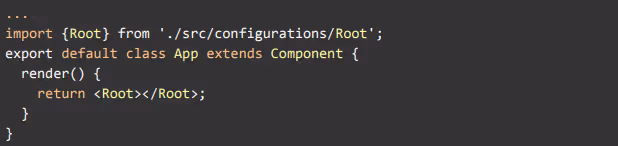
Finally change App.js to use our Root Component and Refresh React Native:
This is the result so far:
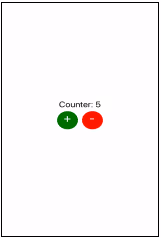
Everytime we press on the ‘+’ and ‘-’ buttons we INCREMENT and DECREMENT our counter. An action is sent to our Store, the Reducer captures such action and updates our state, useSelector takes care of rendering the view with the new value.
This is very simple and not that useful but you’ve learned what a Reducer is, how to capture dispatched actions and how to manage the updated state.
SAGAS
We said that Sagas are like ‘actions’, that's a vague explanation so let's expand on it. The term refers to the Saga design pattern which describes:
"A way to manage data consistency across microservices in distributed transaction scenarios. A saga is a sequence of transactions that updates each service and publishes a message or event to trigger the next transaction step. If a step fails, the saga executes compensating transactions that counteract the preceding transactions".
So if we apply this definition a Saga is a series of actions that perform updates on the app state, publishes events and can trigger another Sagas. The Sagas will be defined by the business model, therefore it's going to be the brain of the application.
Sagas are implemented as Generator functions that yield objects to the redux-saga middleware. The yielded objects are a kind of instruction to be interpreted by the middleware.
When a Promise is yielded to the middleware, the middleware will suspend the Saga until the Promise completes.
"Calling a generator function does not execute its body immediately; an iterator object for the function is returned instead. When the iterator's next() method is called, the generator function's body is executed until the first yield expression, which specifies the value to be returned from the iterator or, with yield*, delegates to another generator function. The next() method returns an object with a value property containing the yielded value and a done property which indicates whether the generator has yielded its last value, as a boolean. Calling the next() method with an argument will resume the generator function execution, replacing the yield expression where an execution was paused with the argument from next(). A return statement in a generator, when executed, will make the generator finish (i.e. the done property of the object returned by it will be set to true). If a value is returned, it will be set as the value property of the object returned by the generator. Much like a return statement, an error is thrown inside the generator will make the generator finished -- unless caught within the generator's body. When a generator is finished, subsequent next() calls will not execute any of that generator's code, they will just return an object of this form: {value: undefined, done: true}"
Objects yielded by Sagas are called Effects. An Effect is an object that contains some information to be interpreted by the middleware. Y
ou can view Effects like instructions to the middleware to perform some operation (e.g., invoke some asynchronous function, dispatch an action to the store, etc.).
Awesome Movies App
Time to make our AwesomeApp actually awesome. It is going to be a movies app where you will be able to search movies by title.
Run the following command on the root folder ‘mkdir envs && cd envs && touch imdb8.json’. This file will contain our Environment variables copy and paste this code:
Tip: We are using IMDB8, a freemium API from rapidapi. If by the time you're reading this document the API_URL or API_KEY are invalid register to Rapidapi and subscribe to IMDB8.
For simplicity we will use Axios, a Promise based HTTP client for the browser and node.js. Install this package with the following command ‘npm install axios’.
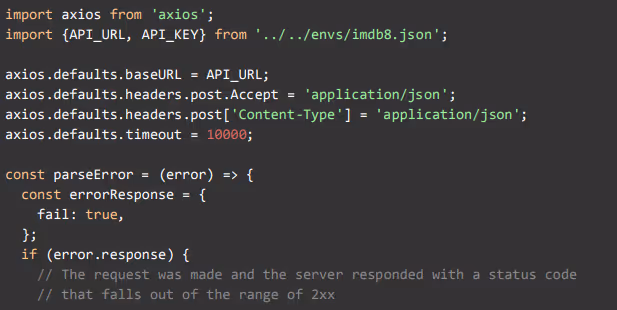
Run the following command under AwesomeApp/src ‘mkdir api && cd api && touch imdb8.api.js’. Now add some code to our Api:
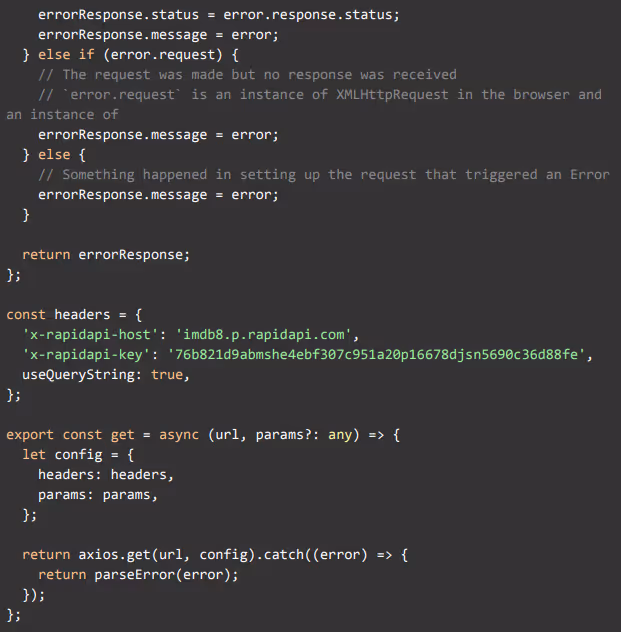
The code snippet above it's pretty self explanatory and we will not dive into it.
Now we have to create the method to fetch movies using the api we just implemented. To do so create a file under /src/api called movies.js. Copy the following snippet into our movies file:

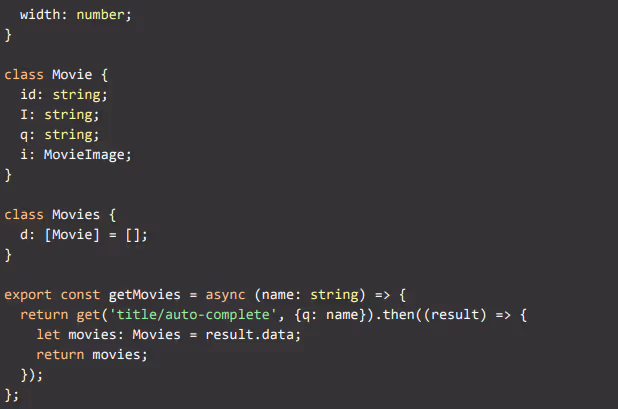
This will be the entry point to the IMDB8 Api. We are simply listing movies based on the Title as the search parameter.
PREFERRED DESIGN PATTERN
Presentational-Container overview:
1. Presentational Component
Presentational components are those components whose only job is to render a view according to the styling and data passed to them.
Essentially, they do not contain any business logic. That's why they are sometimes also called dumb components.
This means that they don't have direct access to Redux or other data stores. Data is passed to them via props.
2. Container Component
Container components are those React components which have access to the store. These components make API calls, do processing and contain the business logic of the app.
Container components shouldn't have the view logic or presentational logic. The job of container components is to compute the values and pass them as props to the presentational components.
Hence, these components are sometimes also referred to as Smart Components.
Awesome, let's take advantage of Sagas now. Run the following command from the root folder ‘cd src && mkdir sagas && cd sagas && touch index.js’. Add the next code snippet to our index saga.
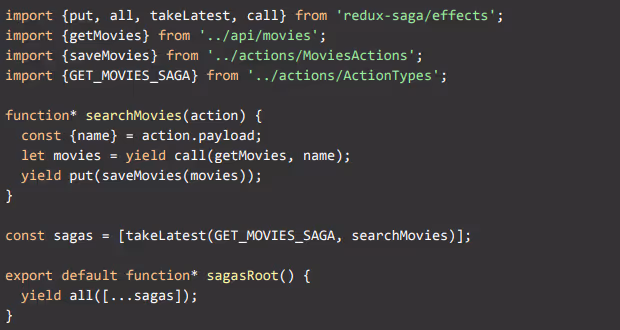
We are declaring searchMovies that receives an action as a parameter. Remember that Sagas yield Effects and that Effects are objects that contain information ? On this example we have 4 Effects:
1. yield call
Creates an Effect description that instructs the middleware to call the function fn with args as arguments.
2. yield put
Creates an Effect description that instructs the middleware to schedule the dispatching of an action to the store. This dispatch may not be immediate since other tasks might lie ahead in the saga task queue or still be in progress.
3. takeLatest
Forks a saga on each action dispatched to the Store that matches pattern. And automatically cancels any previous saga task started previously if it's still running. Each time an action is dispatched to the store. And if this action matches pattern, takeLatest starts a new saga task in the background.
If a saga task was started previously (on the last action dispatched before the actual action), and if this task is still running, the task will be cancelled.
4. all
Creates an Effect description that instructs the middleware to run multiple Effects in parallel and wait for all of them to complete. It's quite the corresponding API to standard Promise#all.
So, first we call our IMDB8 API with a name parameter. When we receive a response with yield put we dispatch an action to save the result on the Store.
With yield all we start every saga provided to the array and takeLatest will be listening when we trigger our search action.
To make all this work we need to change our Root Component. Update Root.js with the following Snippet:
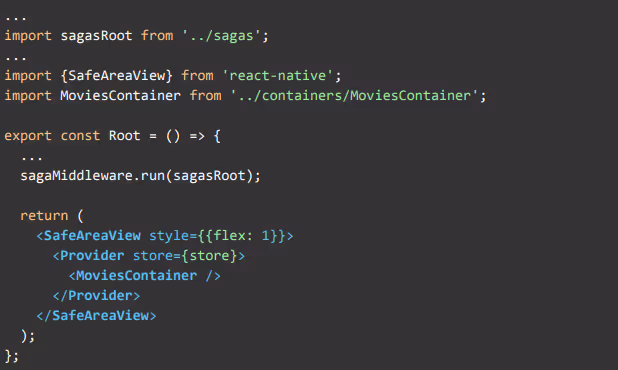
With sagaMiddleware.run(sagasRoot) we are starting every saga in our index file. Noticed that we also changed the component and added MoviesContainer ? Our MoviesContainer is the middleman between our presentational components and the business logic.
Start by running this command from the root directory ‘cd src && mkdir containers && cd containers && touch MovieContainers.js’. Copy and paste the next Code Snippet:
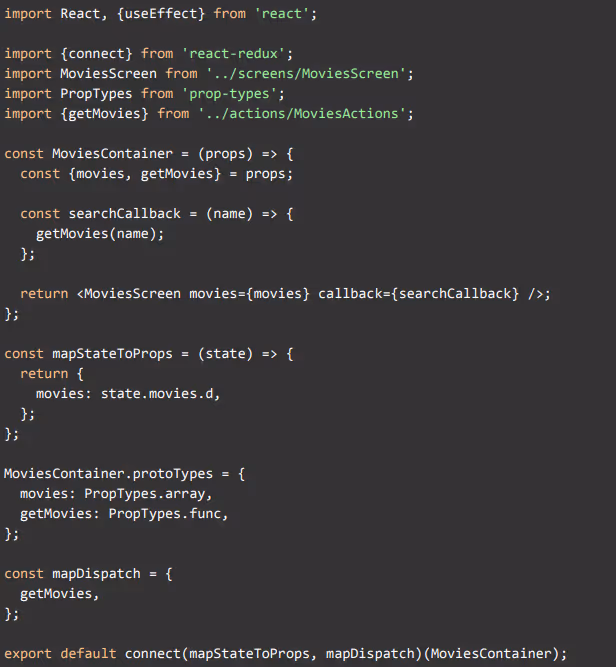
What's interesting here is the connect function.
"The connect() function connects a React component to a Redux store.
It provides its connected component with the pieces of the data it needs from the store, and the functions it can use to dispatch actions to the store. It does not modify the component class passed to it; instead, it returns a new, connected component class that wraps the component you passed in.
The mapStateToProps and mapDispatchToProps deals with your Redux store’s state and dispatch, respectively. state and dispatch will be supplied to your mapStateToProps or mapDispatchToProps functions as the first argument.
The returns of mapStateToProps and mapDispatchToProps are referred to internally as stateProps and dispatchProps, respectively. They will be supplied to mergeProps, if defined, as the first and the second argument, where the third argument will be ownProps.
The combined result, commonly referred to as mergedProps, will then be supplied to your connected component"
We are wrapping MoviesContainer with the Redux Store and in exchange we get access to ourdefined actions. It's a good practice to have your actions on separate files.
These Actions refer to the Objects returned by Effects. Let's define our Actions. From the root directory run this command ‘cd src && mkdir actions && cd actions && touch MoviesActions.js && touch ActionTypes.js’.
ActionTypes.js will have our constant values. Remember that Actions are Strings ? Here is where we define them. Add this snippet to your ActionTypes.js.

Copy and Paste the following Snippet to MoviesActions.js.
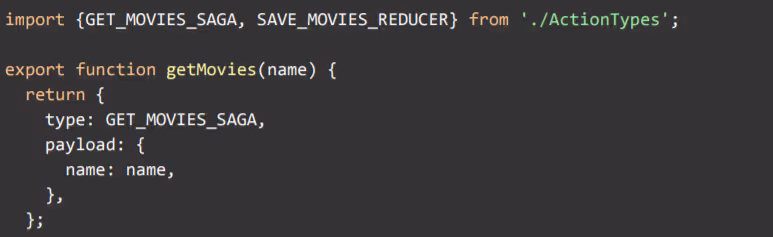
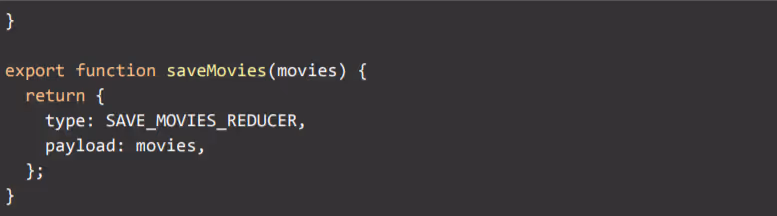
We defined two Actions. One to get the Movies from IMDB8 API and another one to store the result on the Redux Store.
Since the idea of the container is to communicate with the presentation layer using props this line -> return <MoviesScreen movies={movies} callback={searchCallback} /> ; does exactly that.
To recapitulate here is a diagram showing the flow of the App

- Events are triggered from the UI
- We capture those events on the Movies Container and trigger the getMovies SAGA
- The Redux Store triggers the Saga which in turn calls the API
- When a response is received the Reducer stores it in the Store
- The Provider then updates the UI with the new State
What's left to do is to include our UI. This next section won’t have any detail on it. The aim is not to learn about React Native UI Components.
We are using React Native Elements to save time so run the following commands on the project.

Create MoviesScreen Component under src/screens.
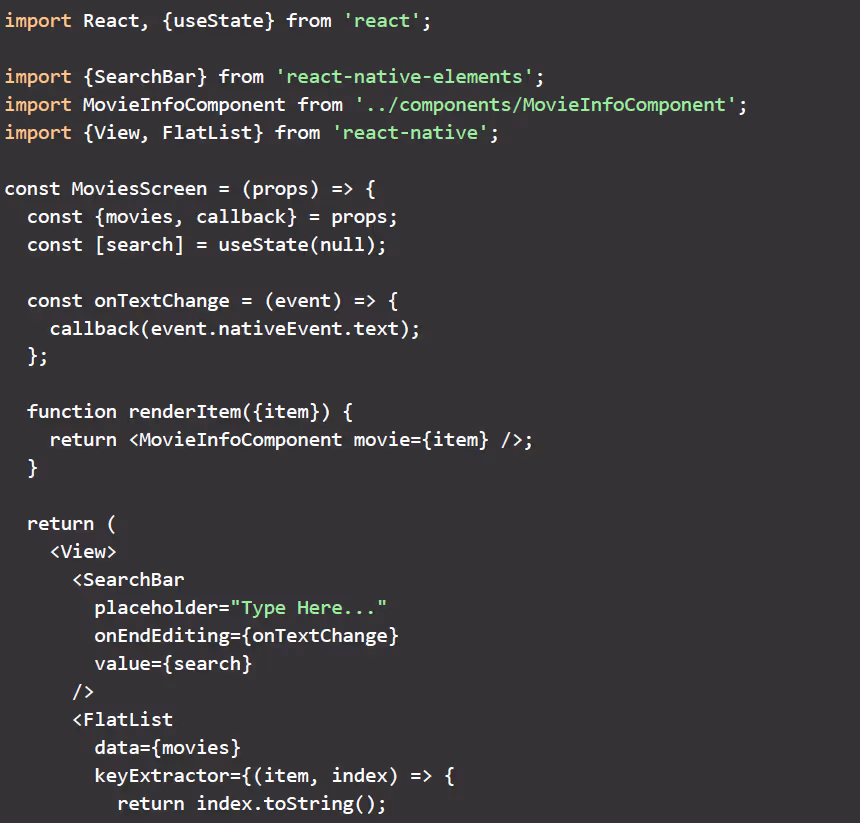
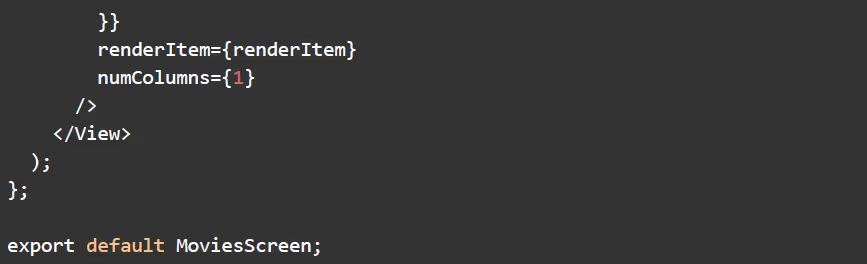
Create MovieInfoComponent under src/components.
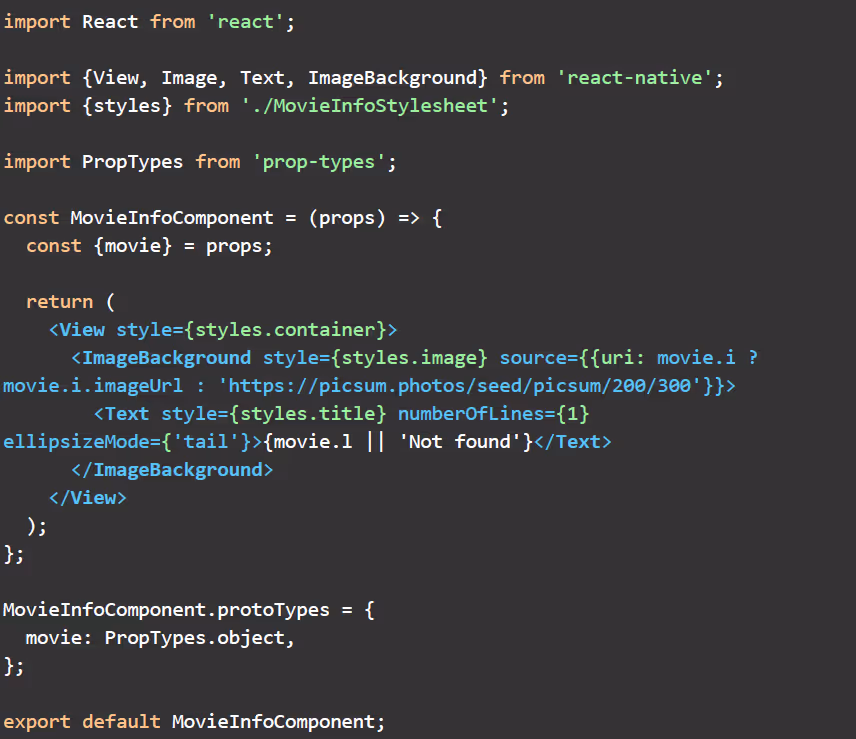
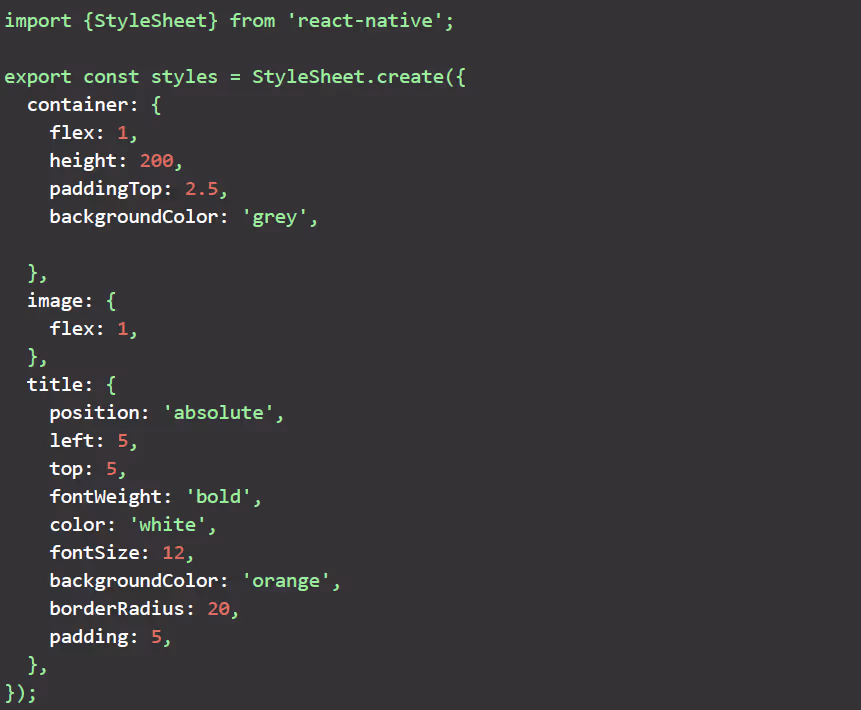
MovieInfoStylesheet.js under src/components.
Awesome right? Everytime we search for a Movie an Action is sent to the Store.
A call is made to IMDB8 and the response is stored in the Redux Store.
After that our Screen is updated with the Movies Info.
We were able to accomplish this while decoupling the business logic from the view.
You’ve learned how to get started with React Native projects that use Redux-Saga and Container-Presentational Components.

Other Blog Posts

Best Generative AI Tools in 2026: The Complete Guide


Nearshore software development in LATAM: The strategic advantages beyond cost