
In a previous entry, we introduced the basic concepts of IoT, its rapid growth, and one of the most widely used communication protocols for IoT devices: the MQTT protocol.
This entry will show a brief tutorial on implementing an MQTT client using the Java programming language. We will be using the libraries provided by the Eclipse Paho project.
Body temperature sensor
We will implement a virtual body temperature measurement device, like a wearable. The purpose of this device is to record (virtual) body temperature and send it to a remote server as required. This example describes the code needed to obtain the temperature value and send it to a remote server using MQTT. We will also see how to receive the data from the server side.
First, we must set up the required libraries and development environment.
Prerequisites
- Basic knowledge of Java programming.
- JDK version 8 or higher.
- Maven.
- IDE of your preference (Eclipse, NetBeans, IntelliJ, VS Code, etc.).
- An MQTT Broker service or implementation
Project setup
After creating a new maven project in your favorite Java IDE, we have to add the following dependency:

The latest version of the Eclipse Paho libraries can be found in the Maven Central repository. Although there is a newer version of the protocol (MQTT v5), we use version MQTT v3 for compatibility reasons in this tutorial.
MQTT Broker
For this example, we will use the MQTT broker implementation from Mosquitto specifically for testing purposes.
The Eclipse Mosquitto project is an MQTT broker implementation that can run on any computer or in the cloud. In this case, we will use the Mosquitto test server at test.mosquitto.org.
We will see later how to use this test server, which is relatively straightforward.
Client setup
The first thing to do to use the Eclipse Paho library is to obtain an implementation of the IMqttClient interface, which contains the methods required by a client application to establish a connection to the server and be able to send and receive messages.
The good thing about the Eclipse Paho library is that it already comes with two implementations of this interface. In this small project, we will use the most straightforward implementation of the interface: MqttClient.
The process is divided into two stages: first, an instance of MqttClient is created, and then that instance connects to the server.
The following steps detail the process to follow.
Create a new MqttClient instance
To create a new instance of MqttClient, we will use the simplest constructor to create a synchronous instance, which is much easier to use and configure. Using the following code snippet, we use the MQTT broker's IP address and a client identifier.

Here we can see that when instantiating the MqttClient, the MQTT broker address is specified. In this case, it is test.mosquitto.org, on port 1883, which does not have any advanced features or security measures since it's a primary test server.
An upcoming blog post will explore how to configure an MQTT broker with basic security implementations properly.
Additionally, the identifier is passed as a parameter, and in this case, we use a random number that will be generated each time it is executed.
Eclipse Paho also offers alternative constructors that allow customization of the persistence mechanism for storing unacknowledged messages and/or the ScheduledExecutorService for running necessary background tasks in the protocol engine implementation.
Connecting to the server
Our newly created MqttClient instance still needs to be connected to the server. We establish the connection by invoking its connect() method, which can be optionally accompanied by a MqttConnectOptions instance. This allows us to customize various protocol aspects.
With the MqttConnectOptions, we can provide additional information such as security credentials, session recovery mode, reconnection mode, and more.
These options are exposed as simple properties in the MqttConnectOptions class, and we can set them using regular setter methods.
It's only necessary to establish the properties required for our specific scenario, as the remaining ones will assume default values.
Here's an example of the code commonly used to establish a connection to the server:
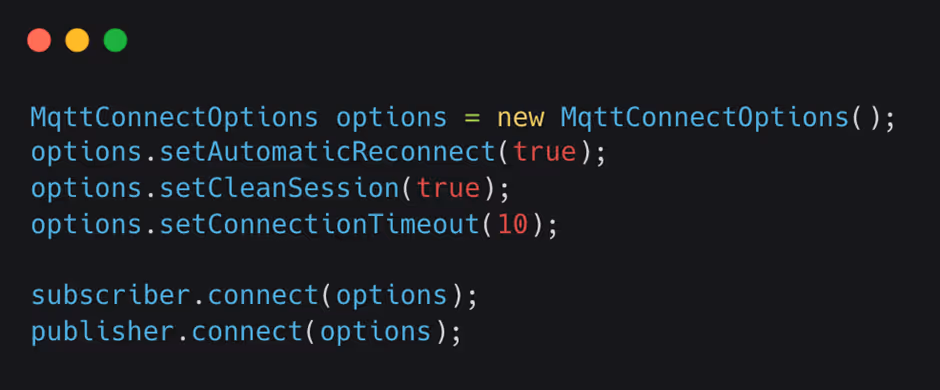
In this case, we configure our connection options as follows:
● The library will handle automatic reconnection attempts in case of network failures.
● Any unsent messages from a previous session will be discarded.
● The connection timeout is set to 10 seconds.
Sending messages
Sending messages using an already connected MqttClient is a simple process. We can utilize one of the variants of the publish() method to send the payload, which is always a byte array, to a specific topic.
Additionally, we can choose from the following quality-of-service options:
0 – "at most once": A.K.A. "fire-and-forget". This option is suitable when message loss is acceptable, as it doesn't require acknowledgment or persistence.
1 – "at least once": This option should be chosen when message loss is unacceptable and your subscribers can handle duplicate messages.
2 – "exactly once": This option is ideal when message loss is unacceptable and your subscribers cannot handle duplicate messages.
In our sample project, the BodyTemperatureSensor class acts as a simulated sensor, generating a new temperature reading each time its call() method is invoked.
This class implements the Callable interface, allowing easy integration with any ExecutorService implementations available in the java.util.concurrent package.
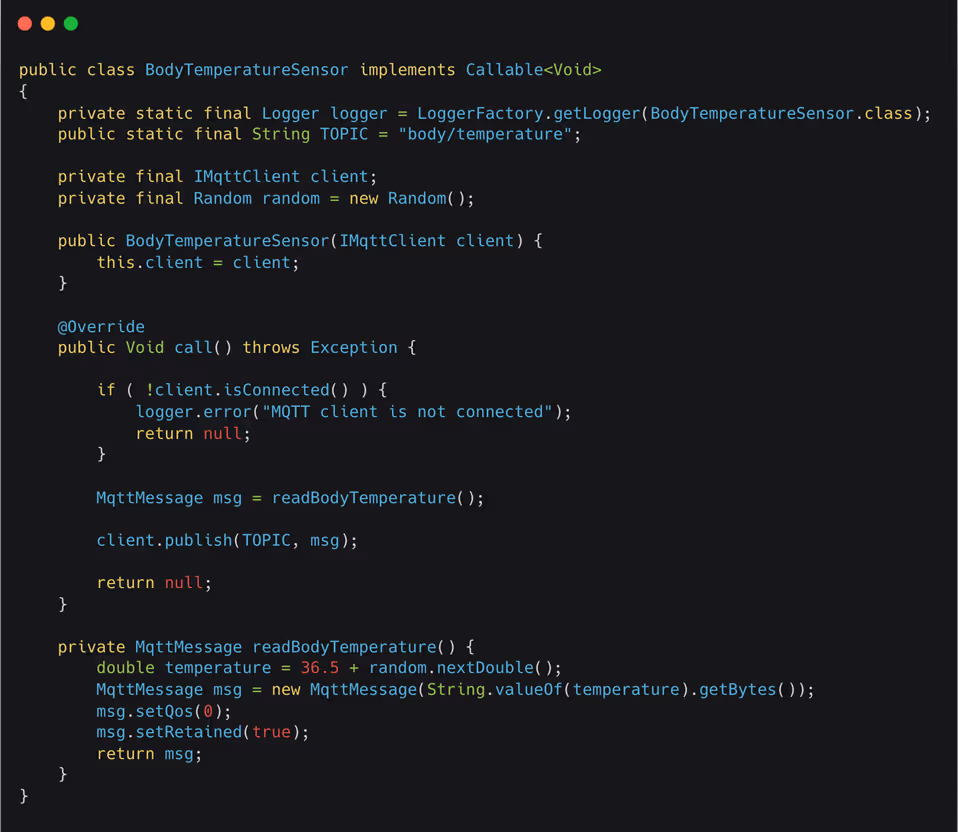
The MqttMessage object serves as a container for the message payload, the requested Quality-of-Service level, and the retained flag. The retained flag informs the broker to maintain the message until a subscriber consumes it.
We can leverage this functionality to implement a "last known good" behavior. When a new subscriber connects to the server, it will immediately receive the retained message, providing valuable information from the past.
Receiving messages
To receive messages from the MQTT broker, we use one of the variants of the subscribe() method. This allows us to specify the following:
● One or more topic filters for the messages we wish to receive.
● The associated Quality of Service (QoS) level.
● The callback handler responsible for processing received messages.
In the example below, we demonstrate how to add a message listener to an existing IMqttClient instance, enabling it to receive messages from a specific topic.
We utilize a CountDownLatch synchronization mechanism between our callback and the main execution thread. Each time a new message arrives, the latch is decremented.
In this sample code, we used a separate IMqttClient instance for message reception to enhance clarity.
However, it's important to note that this is not a limitation of Paho. If desired, you can use the same client to publish and receive messages.

The above-mentioned subscribe() variant accepts an IMqttMessageListener instance as its second argument.
Here we use a simple lambda function that processes the message payload and decrements a counter. If insufficient messages arrive within the specified time window (1 minute), the await() method will raise an exception.
When using the Paho library, there is no need to acknowledge the receipt of messages explicitly. If the callback function completes without any exceptions, Paho assumes that the message was successfully consumed and sends an acknowledgment to the server.
However, the client will be shut down if the callback function throws an exception. It's important to note that this will result in the loss of any messages sent with a QoS level of 0.
On the other hand, messages sent with QoS levels 1 or 2 will be retransmitted by the server once the client is reconnected and re-subscribes to the respective topic.
Conclusion
This article has a very brief and simple example of implementing an MQTT client using the Eclipse Paho Project in Java.
Additionally, we have used the test MQTT broker provided by Mosquitto, and in an upcoming blog post, we will explore the implementation of a local broker with a basic configuration.
All the code for this small project is available on GitHub.

Other Blog Posts
.webp)
Does Your Business Need a Data Warehouse?